Oracle Linux 8へHoubouをインストールする方法
Oracle Linux 8にインストールする
某、大学生から 「インストールできないではないですか」 とクレームが入ったためOracle Linux 8で手順をまとめました、前提条件として、Oracle Linux 8のVMのホストオンリーアダプタに192.168.253.33のIPが設定済みになっているものとしています
インストール事前準備
インストール時に問題を起こすことがあるので、SELINUXは無効化してください。
- /etc/selinux/conf
SELINUX=disabled$ sudo getenforce
Disabledパッケージのインストール
必要なパッケージをインストールします。
nginx
$ sudo dnf install -y nginxPostgreSQL
データベースをインストールします。
$ sudo dnf install -y postgresql-server postgresqlRedis
セッションストレージで利用するためのKVSのインストールします。
$ sudo dnf install -y redisデータベース初期化
データベースを起動するための初期化を行います、postgresユーザーで実行してください。
$ sudo su - postgres
$ /usr/bin/initdb -E UTF8 -D /var/lib/pgsql/data/
...
$ exit
サービスの起動
必要なデーモンを起動します。
- PostgreSQL起動
$ sudo systemctl start postgresql
$ sudo systemctl enable postgresql
Created symlink /etc/systemd/system/multi-user.target.wants/postgresql.service → /usr/lib/systemd/system/postgresql.service.- Redis起動
$ sudo systemctl start redis
$ sudo systemctl enable redis
Created symlink /etc/systemd/system/multi-user.target.wants/redis.service → /usr/lib/systemd/system/redis.service.
Firewalldの設定
ポート80とポート443は通信が可能になるように設定します、再起動後も有効にするために、permanentで設定します、必要に応じて行ってください。
[dep@or8ks ~]$ sudo firewall-cmd --permanent --zone=public --add-service=http
success
[dep@or8ks ~]$ sudo firewall-cmd --permanent --zone=public --add-service=https
success
[dep@or8ks ~]$ sudo firewall-cmd --reload
success
確認
$ sudo firewall-cmd --list-all
public (active)
  target: default
  icmp-block-inversion: no
  interfaces: enp0s3 enp0s8
  sources:
  services: cockpit dhcpv6-client http https ssh
  ports:
  protocols:
  forward: no
  masquerade: no
  forward-ports:
  source-ports:
  icmp-blocks:
  rich rules:
Houbouの初期化
DB接続ユーザーの作成
Houbouがデータベースに接続するユーザーを作成します。
$ createuser -U postgres -i -l -S -d hbuser -P
新しいロールのためのパスワード: [DBパスワード]
もう一度入力してください: [DBパスワード]
$
houbouデータベースの作成
データベースを作成するユーザーは、DB接続ユーザーの作成で作成したユーザーを利用してください。
$ createdb -U hbuser -E UTF-8 -O hbuser houbouHoubouパッケージのインストール
Houbouのプログラムをインストールします、以下のURLから取得してください
$ sudo rpm -Uvh Houbou-0.11.11-1.el8.x86_64.rpm
Verifying...                          ################################# [100%]
準備しています...              ################################# [100%]
更新中 / インストール中...
   1:Houbou-0.11.11-1.el8             ################################# [100%]
$
Houbouの接続設定を確認します、接続ユーザー、パスワード、データベース名の確認をしてください。
- /etc/sysconfig/houbou
YESOD_PGUSER=hbuser
YESOD_PGPASS=[DBパスワード]
YESOD_PGHOST=localhost
YESOD_PGPORT=5432
YESOD_PGDATABASE=houbou
YESOD_PGPOOLSIZE=32
REDIS_HOST=127.0.0.1
REDIS_PORT=6379
REDIS_PASSWORD=
REDIS_DATABASE=0
REDIS_MAX_CONNECTIONS=32
REDIS_MAX_IDLE_TIME=60
アップロードメディアの保存先ディレクトリを作成します、このディレクトリは外部に公開するよう後でnginxに設定します。
$ sudo mkdir -p /pub/images
$ sudo chown houbou:houbou /pub/images
初期データベースのインポート
データベースのスキーマをインポートし初期化します。
$ cd /usr/share/Houbou-0.9.14/data/「Houbou-0.9.14」の部分はインストールしたバージョンで置き換えてください。
バージョンアップ時にマイグレーションするための、マイグレーション管理情報を初期化します。
$ cd /usr/share/Houbou-0.11.11/data/
$ migrate init postgres://hbuser:[DBパスワード]@localhost:5432/houbou
Initializing schema
$
データベースをマイグレーションします。
- /usr/share/Houbou-0.11.11/data/migration.sh
USERとPASSをデータベース作成時の設定へ調整(編集)してマイグレーションする
#!/bin/bash

USER="hbuser"
PASS="[DBパスワード]"
HOST="localhost"
PORT="5432"
DBNAME="houbou"
DIR="./migrate/"

migrate migrate postgresql://${USER}:${PASS}@${HOST}:${PORT}/${DBNAME} ${DIR}

if [ $? -gt 0 ]; then
    echo "Check initialize migration."
    echo "  migrate init postgres://${USER}:${PASS}@${HOST}:${PORT}/${DBNAME}"
fi
マイグレーション
$ ./migration.sh
Execute:        01_schema.sql
Execute:        02_initial_insert.sql
Execute:        20201010155853_alter_tbl_post.migration
Execute:        20201011160813_alter_tbl_free.migration
Execute:        20201017055635_alter_tbl_post.migration
Execute:        20201017055638_alter_tbl_free.migration
Execute:        20201105044325_alter_tbl_blog_setting.migration
Execute:        20201106191251_alter_tbl_post.migration
Execute:        20201109070324_alter_tbl_free.migration
Execute:        20210104050326_alter_tbl_blog_setting.migration
Execute:        20210105055401_alter_tbl_mst_tag.migration
Execute:        20210529051302_create_tbl_category_id_seq.migration
Execute:        20210529051318_create_tbl_category.migration
Execute:        20210804050934_alter_tbl_post.migration
Execute:        20210804050938_alter_tbl_free.migration
TLS・SSLの設定
Houbouはプロダクション環境では、SSL通信配下で動作するよう調整されているため、SSLの設定を行ってください、SSLの設定について こちら を参考に行ってください。
非SSL環境ではクッキーやCSRFなどの機能が正常に動作しません、今回は自前SSLで対応します。
秘密鍵作成
$ sudo su -
# cd /etc/nginx/
# cd mkdir ssl
# cd ssl/
# openssl genrsa -aes256 2048 > key_pri.pem
Generating RSA private key, 2048 bit long modulus (2 primes)
.......................+++++
.+++++
e is 65537 (0x010001)
Enter pass phrase: パスワード
Verifying - Enter pass phrase: パスワード
パスワード除去
# openssl rsa -in key_pri.pem -out nokey_pri.pem
Enter pass phrase for key_pri.pem: 先ほど入れたパスワード
writing RSA key
#
CSR作成
# openssl req -new -key nokey_pri.pem -out server.csr
You are about to be asked to enter information that will be incorporated
into your certificate request.
What you are about to enter is what is called a Distinguished Name or a DN.
There are quite a few fields but you can leave some blank
For some fields there will be a default value,
If you enter '.', the field will be left blank.
-----
Country Name (2 letter code) [XX]:JP
State or Province Name (full name) []:Shizuoka
Locality Name (eg, city) [Default City]:Mishima
Organization Name (eg, company) [Default Company Ltd]:Comp Ltd
Organizational Unit Name (eg, section) []:
Common Name (eg, your name or your server's hostname) []:192.168.253.33
Email Address []:examuser@omoro.jp

Please enter the following 'extra' attributes
to be sent with your certificate request
A challenge password []: 空
An optional company name []: 空
#
SSL証明書を発行
# openssl x509 -in server.csr -days 365000 -req -signkey nokey_pri.pem > server.crt
Signature ok
subject=C = JP, ST = Shizuoka, L = Mishima, O = Comp Ltd, CN = 192.168.253.33, emailAddress = examuser@omoro.jp
Getting Private key
#
出来上がるとこんな感じ
# ls -l
total 16
-rw-r--r-- 1 root root 1766 May 26 17:58 key_pri.pem
-rw------- 1 root root 1675 May 26 17:59 nokey_pri.pem
-rw-r--r-- 1 root root 1289 May 26 18:04 server.crt
-rw-r--r-- 1 root root 1037 May 26 18:03 server.csr
#
何をしているかは WebサーバーへSSL証明書の設置方法 をご参照ください
nginxの設定
Houbouをnginxのリバースプロキシ経由で動作させるための設定です。
upstream hbapps {
    server localhost:3000;
}

server {
    listen 192.168.253.33:443 ssl;
    server_name 192.168.253.33;

    ssl_ciphers 'HIGH:3DES:!aNULL:!MD5:!SEED:!IDEA';
    ssl_certificate  ssl/server.crt;
    ssl_certificate_key ssl/nokey_pri.pem;

    gzip on;
    gzip_types text/css application/javascript application/json application/xml;
    gzip_min_length 500;
    gzip_buffers 4096 4k;
    etag off;
    #charset koi8-r;
    client_max_body_size 600m;

    root /pub/;

    access_log /var/log/nginx/houbou.access_log main;
    error_log /var/log/nginx/houbou.error_log info;

    location / {
        proxy_set_header Host $host;
        proxy_set_header X-Forwarded-Proto https;          # For Yesod approot
        proxy_set_header X-Real-IP          $remote_addr;
        proxy_set_header X-Forwarded-For    $proxy_add_x_forwarded_for;
        proxy_set_header X-Forwarded-Host   $host;
        proxy_set_header X-Forwarded-Server $host;
        proxy_pass http://hbapps/;
        proxy_redirect https://$host/ /;
        proxy_cookie_path / /;
    }

    location /images/ {
        expires 1d;
    }
}
nginxを起動する
$ sudo systemctl start nginx
$ sudo systemctl enable nginx
Created symlink /etc/systemd/system/multi-user.target.wants/nginx.service → /usr/lib/systemd/system/nginx.service.
設定はサンプルですので必要に応じて修正してください。
Houbouを起動する
$ sudo systemctl start houbou
$ sudo systemctl enable houbou
Created symlink /etc/systemd/system/multi-user.target.wants/houbou.service → /usr/lib/systemd/system/houbou.service.
アクセスする
- https://[ドメイン or IP]/
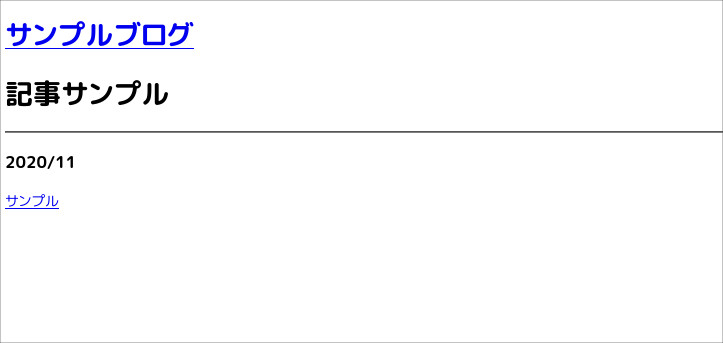
- 管理画面ログイン
- https://[ドメイン orIP]/hb-admin
- ID: webmaster@example.com
- PASSWD: webmaster
- https://[ドメイン orIP]/hb-admin
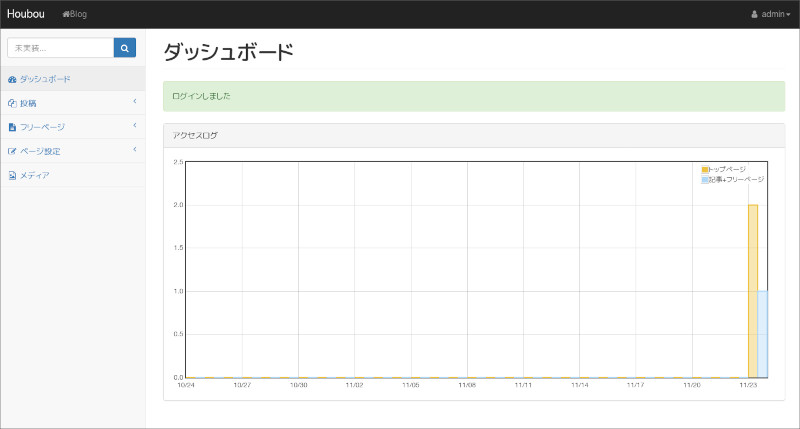
アクセスできれば完了です。
初期化後の設定
ログインパスワードなどの初期設定を変更してからご利用ください。
- アカウント管理
- adminのログインIDをパスワードの変更
- セッティング
- URLの変更
- メディアURLの変更
- アップロードファイルの最大サイズの設定
- セッション制限時間の設定
以上となります。
Posted on 2022-05-26 18:42:45